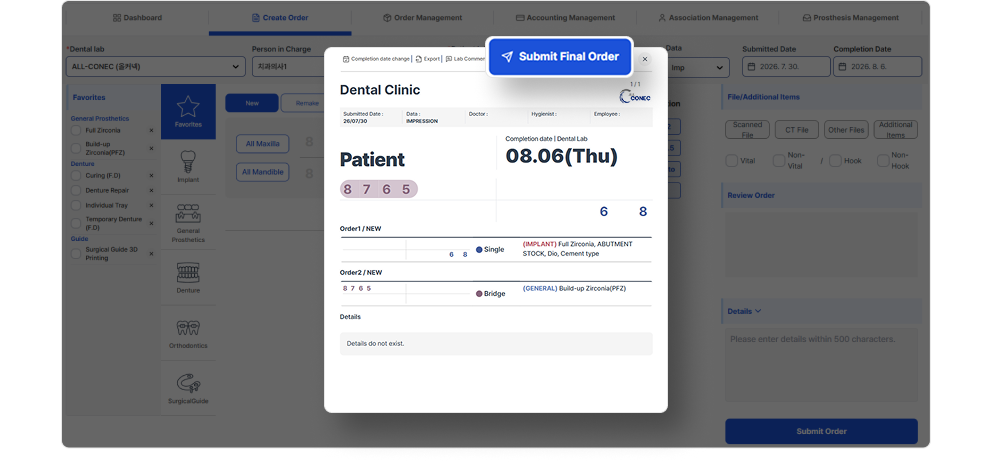
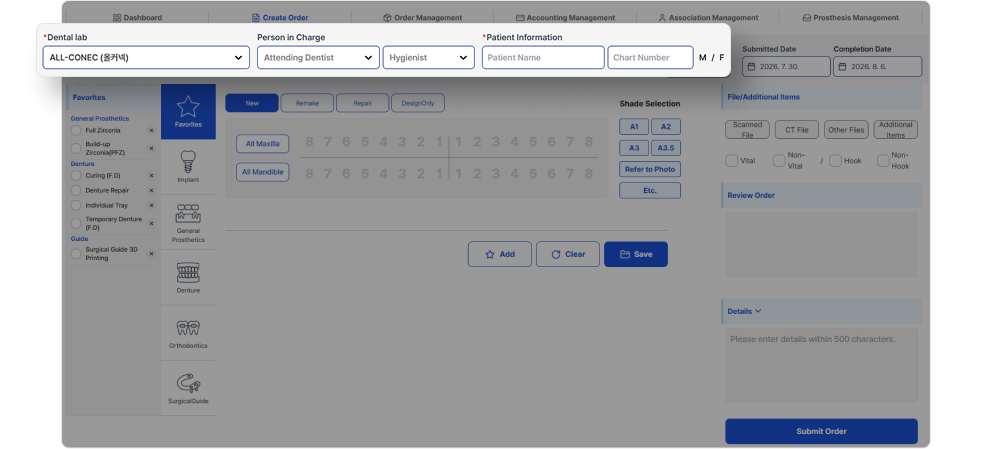
Screen Location
DESIGN ORDER > Create Request Form

Feature Details
Expand each section to view the feature description, instructions, key points, and related screens.
01Enter dental clinic and patient informationEnter the dental lab, staff member, and patient information for the request.
Description
- This section is used to select the dental lab before creating the request form and to enter staff and patient information.
- Patient name is required. Chart number is optional, but recommended.
How to Use
- Select the dental lab from the dental lab dropdown.
- Select the staff member or assigned dental hygienist.
- Enter the patient name and chart number.
Check Point
- Entering the chart number makes it easier to identify the same patient and search orders later.
- If the desired dental lab is not displayed, first check the partner status in Affiliation Management.
Related Screens

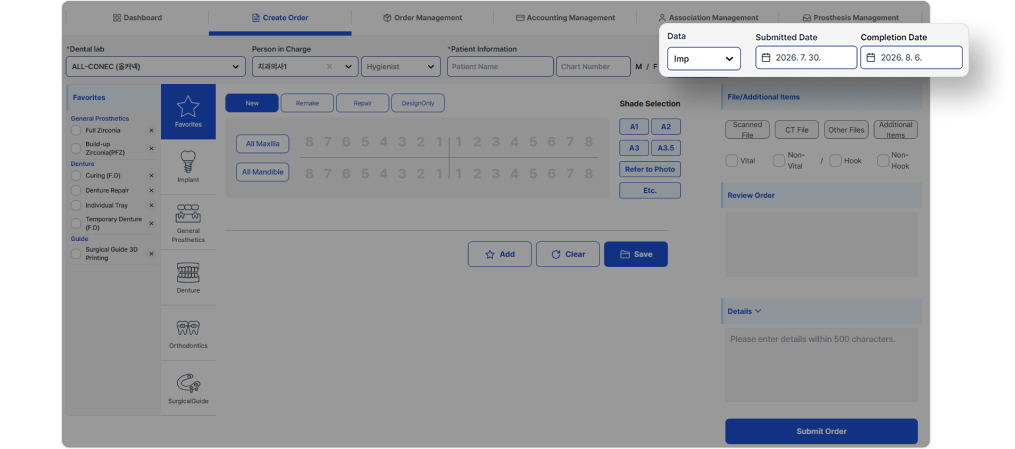
02Select data type and completion dateSelect whether to send physical items or files, and set the requested completion date.
Description
- Select the data delivery method as IMP or SCAN.
- The completion date is set to 7 days later by default and can be changed if needed.
How to Use
- Select IMP when proceeding with physical delivery.
- Select SCAN when attaching digital files such as scan files.
- If the completion date does not match your required schedule, change the date.
Check Point
- If you need to set the completion date earlier than 7 days, we recommend consulting the dental lab in advance.
- The submission date cannot be changed by the dental clinic, so no additional action is required.
Related Screens

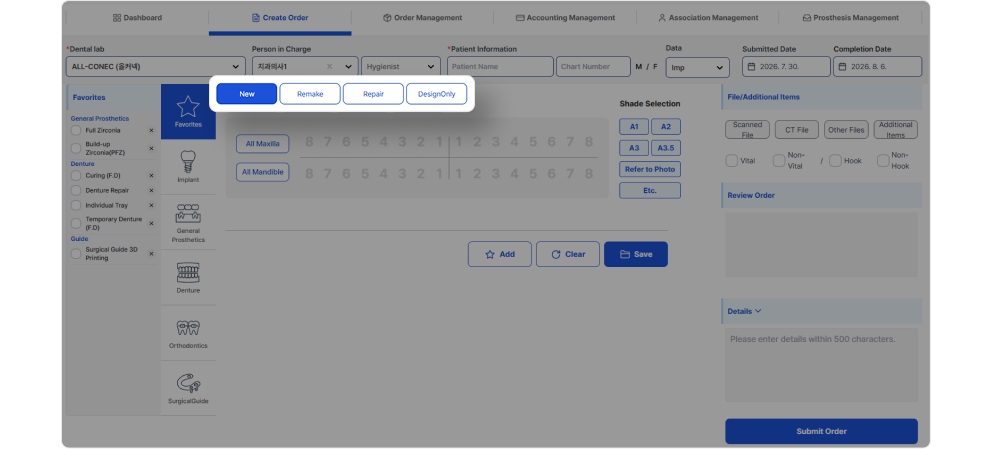
03Select order statusSelect whether the order is New, Remake, Repair, or Design Only.
Description
- This section is used to select the order status based on the work purpose.
- Use New for general new requests. It is selected by default.
How to Use
- Select New for an initial production request.
- Select Remake when reproduction is required.
- Select Repair for a repair request.
- Select DesignOnly when requesting design work only.
Check Point
- For Remake or Repair, leaving the previous request information and reason helps the dental lab understand the details.
Related Screens

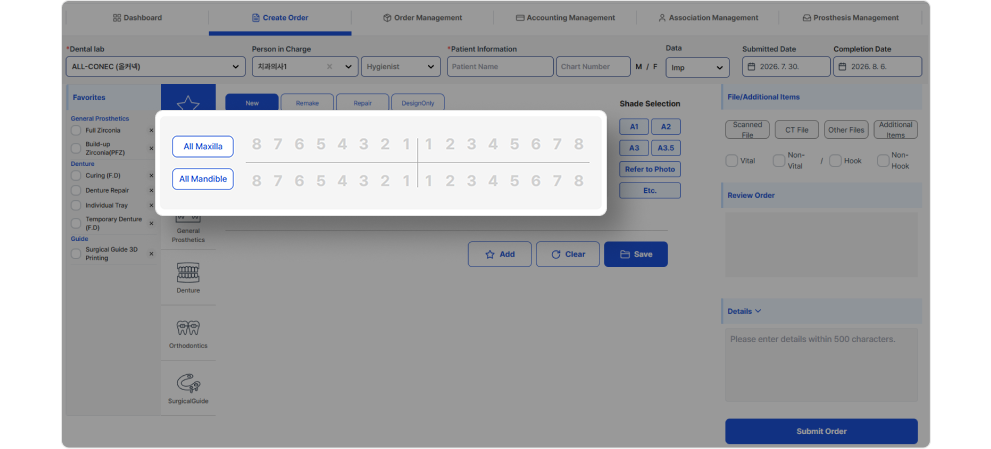
04Select tooth numberSelect the tooth position to work on.
Description
- This section is used to specify the tooth number for the selected prosthetic work.
- You can select the full upper arch, full lower arch, or individual teeth.
How to Use
- Click the tooth number to work on.
- If full-arch work is required, select full upper arch or full lower arch.
- For connected work such as bridges or pontics, select the required tooth range.
Check Point
- The prosthetic item and tooth selection must both be completed to be reflected correctly in the order details after saving.
Related Screens

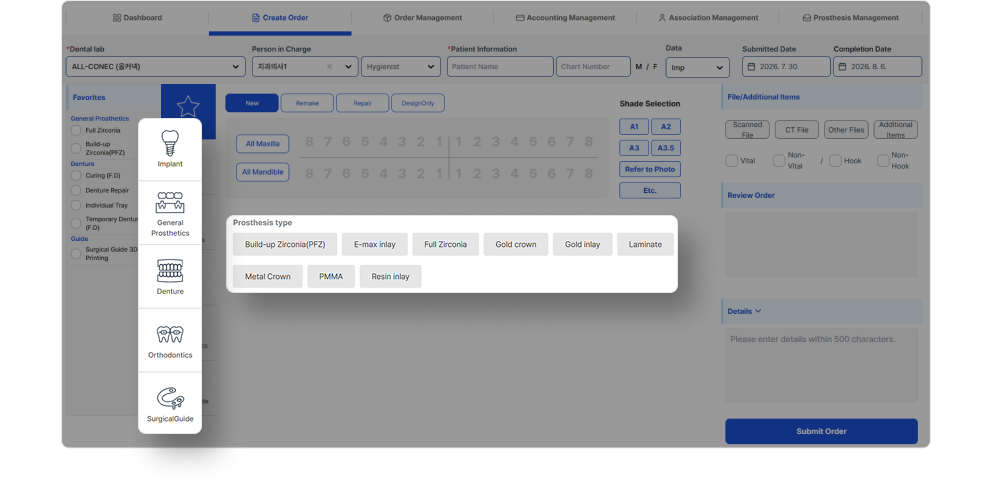
05Select prosthetic itemSelect the category and detailed item for the prosthetic work to request.
Description
- Select a work category such as Implant, General Prosthetics, Orthodontics, or Guide from the left area.
- The list is displayed based on the prosthetic items provided by the selected dental lab.
How to Use
- Select a category.
- Check the detailed prosthetic item.
- After selecting all required items, click Save.
Check Point
- If the desired prosthetic item is not displayed, check the dental lab’s prosthetic price list and contact the dental lab.
Related Screens

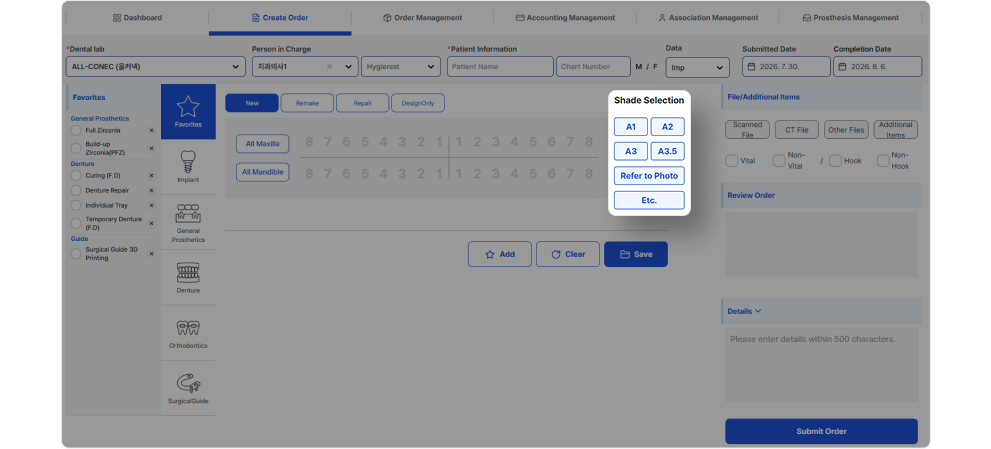
06Select shadeSelect tooth shade information if needed.
Description
- This section is used to select shade information such as A1, A2, A3, A3.5, Photo Reference, or Other.
- It is used as reference information for production by the dental lab.
How to Use
- Select the applicable shade button.
- If a photo reference is needed, select Photo Reference and add the photo in the file attachment area.
- For a shade not listed, select Other and enter the details in the additional details field.
Check Point
- For work where shade is important, sending photos and notes together can reduce the need for rechecking.
Related Screens

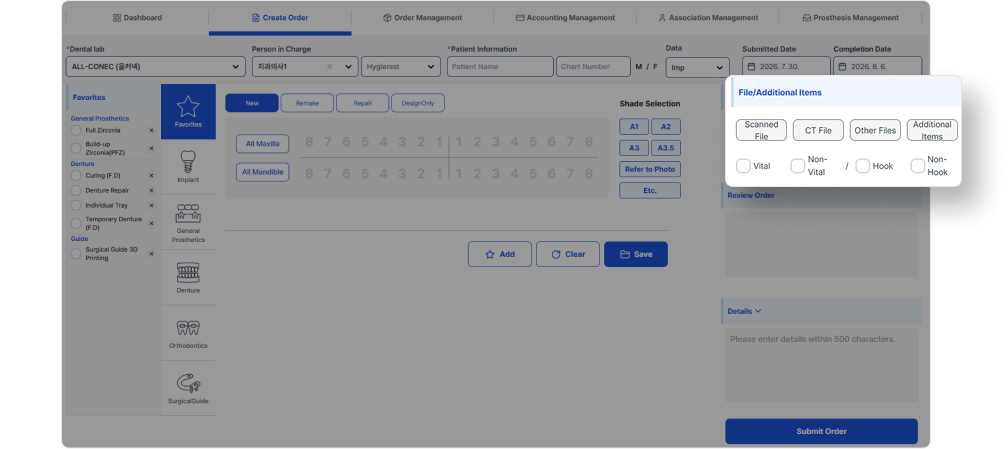
07Files / Additional items and work optionsCheck scan files, CT files, other files, additional items, and Vital/Hook options.
Description
- This section is used to attach files required for the work or check whether physical items are enclosed.
- Vital / Non-Vital and Hook / Non-Hook are reference options for the dental lab’s work.
How to Use
- Select the required items among scan file, CT file, file attachment, and enclosed items.
- Check the pulp status and Hook option if needed.
- For orders requiring file transfer, check that no files are missing.
Check Point
- Some work, such as surgical guides, may require both scan files and CT files.
- If there are additional items, check that the delivered items match the request form details.
Related Screens

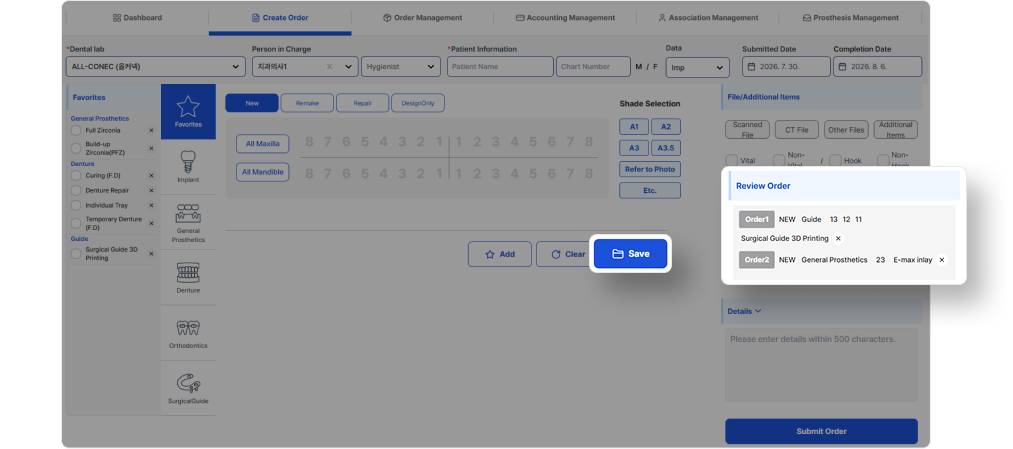
08Save and add order itemsSave the selected work details to the order list and add multiple items.
Description
- Clicking the Save button reflects the currently selected work details in the order list.
- You can add multiple work items to a single request form.
How to Use
- Check the prosthetic item, tooth number, shade, and file options.
- Click Save.
- If there is additional work, enter the work details in the same way and save again.
Check Point
- Before submission, check the order details area on the right to confirm the saved work is reflected correctly.
Related Screens

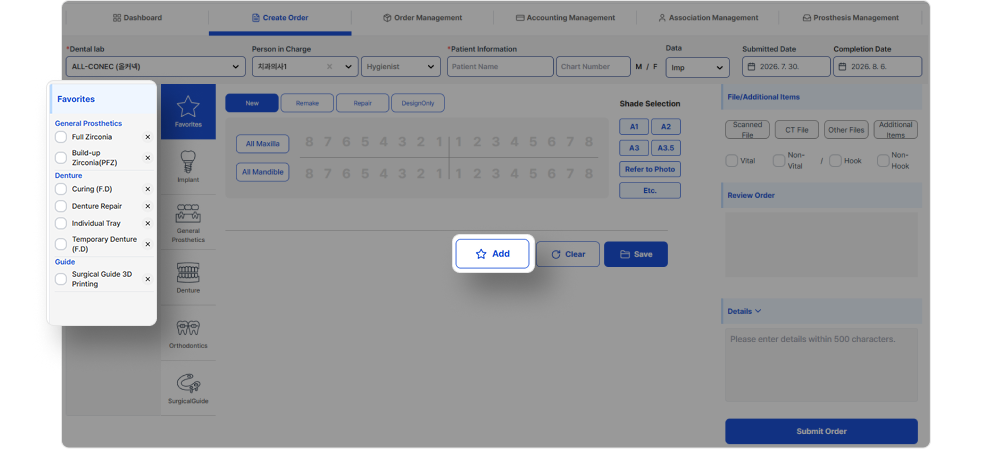
09Register favoriteSave frequently used work combinations for quick entry.
Description
- If frequently ordered prosthetic combinations are similar for each dental lab, you can register them as favorites.
- Selecting a registered favorite can reduce the time required to enter work details.
How to Use
- Select the frequently used category and prosthetic item.
- Set the required options and click the Add button.
- For future orders to the same dental lab, quickly select it from Favorites.
Check Point
- Favorites are most effective when the work process is consistent for each dental lab.
Related Screens

10Enter details and final submissionEnter additional requests and perform the final check on the submission screen.
Description
- In Details, enter requests that are difficult to communicate through prosthetic item selection alone.
- Clicking the Submit button opens the request confirmation screen. After checking the order details, proceed with final submission.
How to Use
- Enter the required request details within 500 characters.
- Frequently used phrases can be registered on the “Affiliation Management > Dental Clinic Settings” screen.
- Click Submit and review the order details on the request form screen.
- Click Final Submit to complete the request form.
Check Point
- Completing the request form does not mean the dental lab starts work immediately. The status changes to Accepted after the dental lab confirms the request.
Related Screens